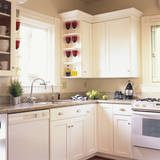
Cleaning Kitchen Cabinets
Cleaning kitchen cabinets can seem like an overwhelming chore, but it doesn't have to be. With a few basic tools, and a simple plan, you will be able to keep things moving along.
Before looking at the different plans below, I want you to know that there are two or three different approaches:
1. Do it all at once
2. Stage it a bit at a time
3. Run away screaming in the opposite direction (okay - I admit - that's not a plan)
Cabinet Door Fronts
Keeping the outside of your kitchen cabinets clean is something that you can do every time you do dishes. You don't need to find an hour for 'cleaning kitchen cabinets' in your schedule.
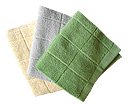
Use the clean dishwater (with dish soap in it - kitchen cabinets fronts tend to be a bit greasy) and a microfiber or other type of cleaning cloth.
First scan the cupboards for spills or really dirty spots and clean any that you find. Then give a couple of cupboards a wipe-down on the front, paying special attention to the area around the handles - because those tend to get dirty quickly.
With no real extra effort on your part, you should be able to clean them all over the course of a week or two without having to set aside extra time.
Cleaning Kitchen Cabinets Inside
Cleaning the interiors of your kitchen cabinets can be a fairly big job. There are two ways to do this - depending on whether you are going to re-organize kitchen cabinets at the same time.
If you are simply cleaning the cabinets, then the task is fairly simple:
1. Half-fill a bucket with warm water and a little dishsoap if you need to use soap. (High quality microfiber cloths will pick up everything, including pathogens, without soap)
2. Remove everything from the cabinet, including any shelf liners (if they are not adhered on of course)
3. Clean the liners, give them a little shake to remove excess moisture, and hang from the back of a chair or outside to dry.
4. Carefully wipe down the inside of the cabinet: tops, sides, shelves and the inside of the doors - you will need a chair or step ladder to reach everything.
5. Check the items you removed from the cabinet and wipe down anything that is stick or dirty. Hand wash any dirty dishes or put them in the dishwasher. Throw away anything that is broken or appears to be spoiled.
6. Dry the liners completely and re-install in the cabinets. (or if necessary - cut and install a new liner)
7. Put clean items back in the cabinet.
8. Shut the cabinet door and move on to the next one.
The thing I like about just cleaning kitchen cabinets is that I can tackle just what I have time for, and do the rest some other time. It's when I want to re-organize that I have to set aside longer periods.
Cleaning Kitchen Cabinets When Re-Organizing Them
When you are faced with cleaning kitchen cabinets and re-organizing them you should really try to have some kind of plan.
1. Decide in advance where you are going to move things to.
2. Decide the order in which you are going to move things around to have the least possible number of items on the table and counter. Keep in mind that things are likely to get very crowded.
3. Clean off the counters and kitchen table.
4. Remove and wipe down items from cabinet #1, and put them well out of the way.
5. Follow steps 3-6 from the section on cleaning kitchen cabinets
6. Empty cabinet #2 - this should contain many items that are going to go into cabinet #1.
7. Clean cabinet #2 and wipe down contents as required.
8. Put items into Cabinet #1 that you want in there.
9. Empty cabinet #3 - this should contain items that are mainly going into either cabinet #2 or cabinet #1.
10. Continue in this pattern as best you can - you will probably build up a kitchen table full of things that you have not put away yet.
11. Deal with the items that do not have homes yet.
12. Take any food that you will not use to your local food bank (as long as it has intact packaging and has not passed its due date), and any food prep items to a thrift store or hold aside for a garage sale.
Plan-Free Approach to Re-Organizing
and Cleaning Kitchen Cabinets
If you prefer a 'plan free' approach then it's simple, but really really messy.
1. Empty out all the cabinets at once
2. clean them all
3. Put everything back where you really want it
4. Take non-perishable food items you don't need to the food bank and kitchenware to your local thrift store.
Back to House Cleaning Home Page from Cleaning Kitchen Cabinets